How to launch a cluster in Spark 3
What is a Spark cluster?
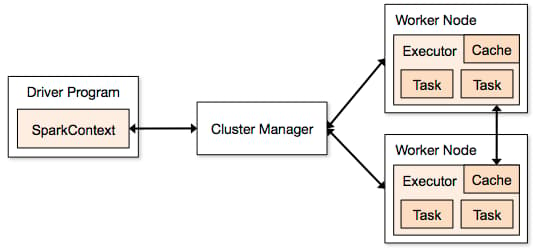
A Spark cluster is a combination of a Driver Program, Cluster Manager, and Worker Nodes that work together to complete tasks. The SparkContext lets us coordinate processes across the cluster. The SparkContext sends tasks to the Executors on the Worker Nodes to run.
Here’s a diagram to help you visualize a Spark cluster:
The first step to manage a Spark cluster is to launch a Spark cluster. Follow the steps below to launch your own.
Launching Spark cluster
This setup is for launching a cluster with one Master Node and two Worker Nodes.
Step 1.1
Install Java on all nodes. To install Java, run the following command:
To check if Java is installed successfully, run the following command:
sudo apt update
sudo apt install openjdk-8-jre-headless
java --version
Step 1.2
You can similarly install Scala on all the nodes.
To check if Scala is installed successfully, run the following command:
sudo apt install scala
scala --version
Step 2
To allow the cluster nodes to communicate with each other, we need to set up keyless SSH. To do so, install openssh-server and openssh-client on the Master Node.
sudo apt install openssh-server openssh-client
Step 3
Create an RSA key pair and name the files accordingly. The following creates key pairs and names the files rsaID and rsaID.pub.
cd ~/.ssh
~/.ssh: ssh-keygen -t rsa -P ""
Generating public/private rsa key pair.
Enter file in which to save the key: rsaID
Your identification has been saved in rsaID.
Your public key has been saved in rsaID.pub.
Then, manually copy the contents of the rsaID.pub file into the ~/.ssh/authorized_keys file in each worker. The entire contents should be in one line that starts with ssh-rsa and ends with ubuntu@some_ip.
To verify if the SSH works, try to SSH from the Master Node into Worker Node. Run the following command:
cat ~/.ssh/id_rsa.pub
ssh-rsa
GGGGEGEGEA1421afawfa53Aga454aAG...
ubuntu@192.168.10.0
ssh -i ~/.ssh/id_rsa ubuntu@192.168.10.0
Step 4
Install Spark on all the nodes using the following command:
wget https://archive.apache.org/dist/spark/spark-2.4.3/spark-2.4.3-bin-hadoop2.7.tgz
Extract the files, move them to /usr/local/spark, and add the spark/bin into the PATH variable.
tar xvf spark-2.4.3-bin-hadoop2.7.tgz
sudo mv spark-2.4.3-bin-hadoop2.7/ /usr/local/spark
vi ~/.profile

export PATH=/usr/local/spark/bin:$PATH

source ~/.profile
Step 5
Now, configure the Master Node to keep track of its Worker Nodes. To do this, we need to update the shell file, /usr/local/spark/conf/spark-env.sh.
CAUTION: If the
spark-env.shdoesn’t exist, copy thespark-env.sh.templateand rename it tospark-env.sh
# contents of conf/spark-env.sh
export SPARK_MASTER_HOST=<master-private-ip>
export JAVA_HOME=/usr/lib/jvm/java-8-openjdk-amd64

# For PySpark use
export PYSPARK_PYTHON=python3
We will also add all the IPs where the worker will be started. Open the /usr/local/spark/conf/slaves file and paste the following:
contents of conf/slaves
<worker-private-ip1>
<worker-private-ip2>
Step 6
Start the cluster using the following command.
sh /usr/local/spark/sbin/start-all.sh
Free Resources

