What Is Android - UI Design?
What is UI design in Android?
Introduction
First of all, what is Android?
Android is a mobile operating system that runs on 75% of mobile phones in the world and is based on a modified version of Linux kernel and other open source software. Android is primarily designed for touch screen mobile devices such as smartphones, smart watches, tablets, Android TV, and automotives. The Android operating system (OS) allows users to interact with it through different devices and a medium called the User Interface (UI).
The UI is what the end user is able to see and interact with to navigate and use different components of the Android OS on an Android application. They are presented to the user in different forms, such as the following:
- Graphical User Interface (GUI): This helps users interact with visual representations on digital devices or smartphones such as a Samsung phone.
- Voice-controlled interfaces: These allow users to interact through voice commands, such as Siri and Alexa.
- Gesture-based interface: Users are able to interact with the interface through body motions.
A poorly designed UI can make it very difficult for users to interact with the Android OS, which is why it is very important that the UI layout is professionally designed with efficient navigation for users. This is where the Android UI Design comes in.
What is Android UI design?
Android UI design involves the use of prebuilt Android UI components, such as structured layout objects and UI controls, to build the graphical user interface for our applications.
An Android App UI screen usually consists of four parts, which are as follows:
- Status bar
- App bar
- Content area
- Bottom navigation bar
The Android OS UI components consists of different types of layouts, and special interfaces such as menus, notifications, and dialogs.
Layouts in Android
Various Android layout types define the structure for a user interface in an application. All the elements in the layout are usually built using a hierarchy of view and viewgroup objects. A view is what usually draws the user in; it is something the user can see and interact with. A view group is a container that is not visible but defines the layout structure for the view. Layouts in Android can be declared in the following two ways:
- Declare the UI elements in XML. We can also use the drag and drop interface in the Android layout editor to build the XML layout.
- Instantiate layout elements at runtime. The application can create
viewandviewGroupobjects and manipulate their properties programmatically.
Types of layouts in Android
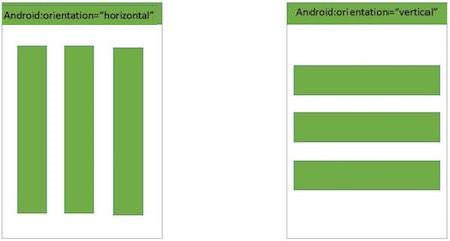
- Linear layout: This is a view group that aligns all children in a single direction, either vertically or horizontally. We specify the layout direction with the
android:orientationattribute.
<?xml version="1.0" encoding="utf-8"?>
<LinearLayout xmlns:android="http://schemas.android.com/apk/res/android"
   android:layout_width="fill_parent"
   android:layout_height="fill_parent"
   android:orientation="vertical" >

   <Button android:id="@+id/btnStartService"
      android:layout_width="270dp"
      android:layout_height="wrap_content"
      android:text="start_service"/>

   <Button android:id="@+id/btnPauseService"
      android:layout_width="270dp"
      android:layout_height="wrap_content"
      android:text="pause_service"/>

   <Button android:id="@+id/btnStopService"
      android:layout_width="270dp"
      android:layout_height="wrap_content"
      android:text="stop_service"/>

</LinearLayout>
- Relative layout: This view group displays child views in positions relative to each other. Each view’s position is specified relative to sibling elements. For example, it could be positioned to the left of or below another view. The view’s position could also be specified relative to the parent, i.e. bottom-aligned, left-aligned, or center-aligned.
<RelativeLayout xmlns:android="http://schemas.android.com/apk/res/android"
   android:layout_width="fill_parent"
   android:layout_height="fill_parent"
   android:paddingLeft="16dp"
   android:paddingRight="16dp" >

   <EditText
      android:id="@+id/name"
      android:layout_width="fill_parent"
      android:layout_height="wrap_content"
      android:hint="@string/reminder" />

   <LinearLayout
      android:orientation="vertical"
      android:layout_width="fill_parent"
      android:layout_height="fill_parent"
      android:layout_alignParentStart="true"
      android:layout_below="@+id/name">

      <Button
         android:layout_width="wrap_content"
         android:layout_height="wrap_content"
         android:text="New Button"
         android:id="@+id/button" />

      <Button
         android:layout_width="wrap_content"
         android:layout_height="wrap_content"
         android:text="New Button"
         android:id="@+id/button2" />

   </LinearLayout>

</RelativeLayout>
- Constraint layout: This is a layout that allows us to create a large and complex layout. This layout has a flat view hierarchy and no nested view groups.
<?xml version="1.0" encoding="utf-8"?>
<androidx.constraintlayout.widget.ConstraintLayout xmlns:android="http://schemas.android.com/apk/res/android"
    xmlns:app="http://schemas.android.com/apk/res-auto"
    xmlns:tools="http://schemas.android.com/tools"
    android:id="@+id/innerRoot"
    android:layout_width="match_parent"
    android:layout_height="match_parent"
    android:background="#AA9A0D"
    android:backgroundTint="#FFEB3B"
    tools:context=".ui.RecyclerListFragment">

    <Button
        android:id="@+id/statusButton"

        android:layout_width="match_parent"
        android:layout_height="wrap_content"
        android:drawableTop="@drawable/ic_baseline_network_check_24"
        android:text="no_internet"
        android:textColor="@color/white"
        android:visibility="visible"
        app:layout_constraintBottom_toBottomOf="parent"
        app:layout_constraintEnd_toEndOf="parent"
        app:layout_constraintStart_toStartOf="parent"
        app:layout_constraintTop_toTopOf="parent" />
<TextView
            android:id="@+id/NameHint"
            android:layout_width="wrap_content"
            android:layout_height="wrap_content"
            android:layout_marginStart="44dp"
            android:layout_marginTop="20dp"
            android:text="PokemonName:"
            android:textColor="@color/white"
            android:textSize="20dp"
            android:textStyle="bold"
            app:layout_constraintStart_toStartOf="parent"
            app:layout_constraintTop_toBottomOf="@+id/cardView" />

</androidx.constraintlayout.widget.ConstraintLayout>
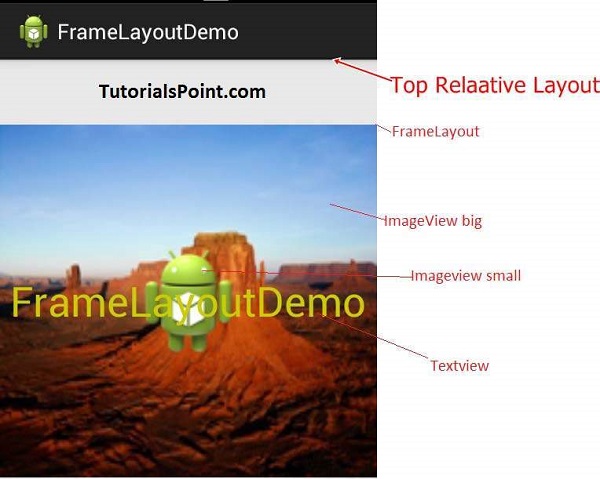
- Frame layout: The
FrameLayoutis a placeholder on screen that we use to display a single view.
<FrameLayout xmlns:android="http://schemas.android.com/apk/res/android"
   android:layout_width="fill_parent"
   android:layout_height="fill_parent">

   <ImageView
      android:src="@drawable/ic_launcher"
      android:scaleType="fitCenter"
      android:layout_height="250px"
      android:layout_width="250px"/>

   <TextView
      android:text="Frame Demo"
      android:textSize="30px"
      android:textStyle="bold"
      android:layout_height="fill_parent"
      android:layout_width="fill_parent"
      android:gravity="center"/>
</FrameLayout>
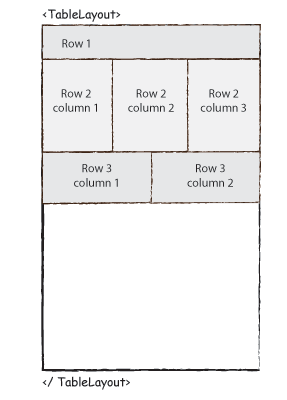
- Table Layout: The
TableLayoutgroups views into rows and columns.
<TableLayout xmlns:android="http://schemas.android.com/apk/res/android"
   android:layout_width="fill_parent"
   android:layout_height="fill_parent">

   <TableRow
      android:layout_width="fill_parent"
      android:layout_height="fill_parent">

      <TextView
         android:text="Time"
         android:layout_width="wrap_content"
         android:layout_height="wrap_content"
         android:layout_column="1" />

      <TextClock
         android:layout_width="wrap_content"
         android:layout_height="wrap_content"
         android:id="@+id/textClock"
         android:layout_column="2" />

   </TableRow>

   <TableRow>

      <TextView
         android:text="First Name"
         android:layout_width="wrap_content"
         android:layout_height="wrap_content"
         android:layout_column="1" />

      <EditText
         android:width="200px"
         android:layout_width="wrap_content"
         android:layout_height="wrap_content" />
   </TableRow>

   <TableRow>

      <TextView
         android:text="Last Name"
         android:layout_width="wrap_content"
         android:layout_height="wrap_content"
         android:layout_column="1" />

      <EditText
         android:width="100px"
         android:layout_width="wrap_content"
         android:layout_height="wrap_content" />
   </TableRow>

   <TableRow
      android:layout_width="fill_parent"
      android:layout_height="fill_parent">

      <RatingBar
         android:layout_width="wrap_content"
         android:layout_height="wrap_content"
         android:id="@+id/ratingBar"
         android:layout_column="2" />
   </TableRow>

   <TableRow
      android:layout_width="fill_parent"
      android:layout_height="fill_parent"/>

   <TableRow
      android:layout_width="fill_parent"
      android:layout_height="fill_parent">

      <Button
         android:layout_width="wrap_content"
         android:layout_height="wrap_content"
         android:text="Submit"
         android:id="@+id/button"
         android:layout_column="2" />
   </TableRow>

</TableLayout>
- Grid View:
GridViewis a ViewGroup that displays items in a two-dimensional, scrollable grid.
<?xml version="1.0" encoding="utf-8"?>
<GridView xmlns:android="http://schemas.android.com/apk/res/android"
   android:id="@+id/gridview"
   android:layout_width="fill_parent"
   android:layout_height="fill_parent"
   android:columnWidth="90dp"
   android:numColumns="auto_fit"
   android:verticalSpacing="10dp"
   android:horizontalSpacing="10dp"
   android:stretchMode="columnWidth"
   android:gravity="center"
/>
The following code is the content of the defined GridView layout above:
<?xml version="1.0" encoding="utf-8"?>
<LinearLayout
   xmlns:android="http://schemas.android.com/apk/res/android"
   android:layout_width="match_parent"
   android:layout_height="match_parent"
   android:orientation="vertical" >

<ImageView android:id="@+id/SingleView"
   android:layout_width="fill_parent"
   android:layout_height="fill_parent"/>

</LinearLayout>
- List View:
ListViewis a view group that displays a list of scrollable items.
<LinearLayout xmlns:android="http://schemas.android.com/apk/res/android"
   xmlns:tools="http://schemas.android.com/tools"
   android:layout_width="match_parent"
   android:layout_height="match_parent"
   android:orientation="vertical"
   tools:context=".ListActivity" >

   <ListView
      android:id="@+id/mobile_list"
      android:layout_width="match_parent"
      android:layout_height="wrap_content" >
   </ListView>

</LinearLayout>
The following code is the content of the defined ListView layout above:
<?xml version="1.0" encoding="utf-8"?>
<!--  Single List Item Design -->

<TextView xmlns:android="http://schemas.android.com/apk/res/android"
   android:id="@+id/label"
   android:layout_width="fill_parent"
   android:layout_height="fill_parent"
   android:padding="10dip"
   android:textSize="16dip"
   android:textStyle="bold" >
</TextView>
External resources in Android
Android UI Design allows external files and elements such as images, vector graphics, SVG to be used in the UI design to beautify it more for great user experience. Such files are kept in a folder called drawable in the Android studio.
Measurements in Android UI Design
We use the DP and SP to define measurement in Android UI. The DP is used to define UI events such as height and weight. The SP is used to define text size so that it is consistent across different devices. It also allows the user to choose their preferred size on their devices.
Conclusion
UI design is an important aspect in Android application development, as it provides the medium for end users to interact with the application. In this article, we explored how to use the different types of layouts in Android.
