Scaffolding a Model from a Database Schema
Explore how to scaffold a model from an existing database schema using Entity Framework Core's reverse engineering workflow. This lesson covers creating a database and tables, generating DbContext and entity classes, and understanding the scaffold command options to keep your model synchronized with the database.
Overview
Reverse Engineering is one of the development workflows of EF Core. It involves scaffolding a model (DbContext and entity types) from a database schema. It is also known as the Database First workflow. Use reverse engineering when you want the database schema to be the primary source of truth.
In this lesson, we’ll do the following:
- Create a database from an SQL file.
- Scaffold a model from the database.
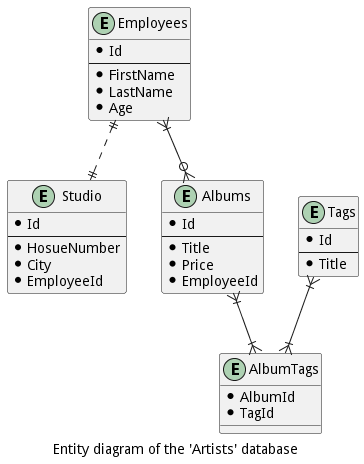
The project includes Artists.sql, which holds the schema for Artists.db. An entity-relationship diagram is shown below:
Note: The commands in this lesson generate code and files. We can navigate to these files through the terminal by using the relevant Linux commands, such as
lsto view a list of files & directories,cdto change directory, andcatto view file contents. A SPA widget showing the updated project with the generated files is also available.
Create the database and tables
Let’s learn how to create a database and tables with the C# project below:
{
    "version": "0.2.0",
    "configurations": [
        {
            // Use IntelliSense to find out which attributes exist for C# debugging
            // Use hover for the description of the existing attributes
            // For further information visit https://github.com/OmniSharp/omnisharp-vscode/blob/master/debugger-launchjson.md
            "name": ".NET Core Launch (console)",
            "type": "coreclr",
            "request": "launch",
            "preLaunchTask": "build",
            // If you have changed target frameworks, make sure to update the program path.
            "program": "${workspaceFolder}/bin/Debug/net6.0/ScaffoldDB.dll",
            "args": [],
            "cwd": "${workspaceFolder}",
            // For more information about the 'console' field, see https://aka.ms/VSCode-CS-LaunchJson-Console
            "console": "internalConsole",
            "stopAtEntry": false
        },
        {
            "name": ".NET Core Attach",
            "type": "coreclr",
            "request": "attach"
        }
    ]
}To create the database, click the “Run” button above. Then, to create an SQLite database called Artists.db and open the SQLite prompt for further actions, execute the following command in the terminal:
Next, we’ll read the table creation commands from Artists.sql and populate the database with the specified tables using the command below:
Finally, we’ll quit the SQLite prompt with the command below:
Note: The
Artists.dbdatabase resides in a directory namedoutput.
Scaffold the database
We’ll use the dotnet ef dbcontext scaffold command to scaffold a model from Artists.db. In the terminal, execute the command below:
The updated project is below:
{
    "version": "0.2.0",
    "configurations": [
        {
            // Use IntelliSense to find out which attributes exist for C# debugging
            // Use hover for the description of the existing attributes
            // For further information visit https://github.com/OmniSharp/omnisharp-vscode/blob/master/debugger-launchjson.md
            "name": ".NET Core Launch (console)",
            "type": "coreclr",
            "request": "launch",
            "preLaunchTask": "build",
            // If you have changed target frameworks, make sure to update the program path.
            "program": "${workspaceFolder}/bin/Debug/net6.0/ScaffoldDB.dll",
            "args": [],
            "cwd": "${workspaceFolder}",
            // For more information about the 'console' field, see https://aka.ms/VSCode-CS-LaunchJson-Console
            "console": "internalConsole",
            "stopAtEntry": false
        },
        {
            "name": ".NET Core Attach",
            "type": "coreclr",
            "request": "attach"
        }
    ]
}Note that the project now contains two new directories named Data and Entities. The files in these directories are below:
Data/ArtistsContext.csEntities/Album.csEntities/Employee.csEntities/Studio.csEntities/Tag.cs
Note: To keep things simple, we include the connection string to the database on line 27 of
ArtistsContext.cs.
The dotnet ef dbcontext scaffold command arguments
Let’s review the arguments for the dotnet ef dbcontext scaffold command.
Connection string
Connection string
The first argument specified in quotes is the connection string. It indicates the data source EF Core uses to read the database schema.
Database provider
The second argument indicates the database provider used by EF Core. It is typically the same as the provider’s NuGet package name. Here, we use it for SQLite.
Data annotations flag
By default, we configure entity types using the fluent API. The data-annotations flag indicates configuration through data annotations instead.
For instance, when using the fluent API, we can scaffold a Name property like this:
But with data annotations, we can scaffold the same Name property like this instead:
Output directory flag
The --output-dir flag specifies a directory for the entity types. The default location is at the root of the project. Here, we place them in a directory named Entities.
Context directory flag
The --context-dir flag specifies a directory for the DbContext class. The default location is at the root of the project. Here, we place them in a directory named Data.