The built-in Box-Model of the WEB
CSS is the styling language for the basic website product HMTL; so, demonstrating it requires some HTML. In this series, we will begin as simply as possible with a single div in the main section.
Due to the small size of our current work, we are keeping this INSIDE the style section rather than in an external file, which is the usual standard.
The Box-Model gives us minimum-width, padding, border, and margin. A similar syntax for border and margin help us in working through this incrementally.
Our first phase gets us ready for constructing Margins. As a warm-up exercise, we will see compatible border-results and how to get there.
Same result different routes
There is a long-form of the border definition that we will use later on, but right now we will warm up with three routes demonstrating the formula of the total width.
The file you see here is called MarBo_Pad.html and stands for Margin, Border, Padding, and Text.
The point of this code is that the routes demonstrate the same formula.

Getting nearer to side-by-side
This picture comes from running the FollowThe_CLOCK.html file.
Objective
One item of real strength that comes from the box-model is having web-pages that are based on an element and its neighbor. By the end of this session, you will see that it is about pushing one into another one’s Margin.
In the HMTL world, this is so common that there is a special type of div explicitly for “Navigation Element”. Since this is a single-page demo, what we are building is a panel-menu; so we will just call it “The Menu”. You DON’T want the menu to be part of what it controls.
In non-jargon, the tail does not wag the dog. From a programmer’s point of view, that would violate a golden rule called “Write Once”.
Stages along the way
To finish up with a “margin-powered” result, you would expect the work to begin with defining margins; however, there are several advantages for beginning with Borders instead:
- Borders are visible, whereas Margins do not have their own color.
- Borders belong to what they enclose NOT the neighbor of what they enclose.
- It is trivial to reuse Border parameters for defining a (very similar) margin.
Margins and borders
As we have stated throughout this lesson, Margins and Borders share common syntax, so the initial work is done. This initial work is the easiest.
Syntax Details – a long form of the Border Definition
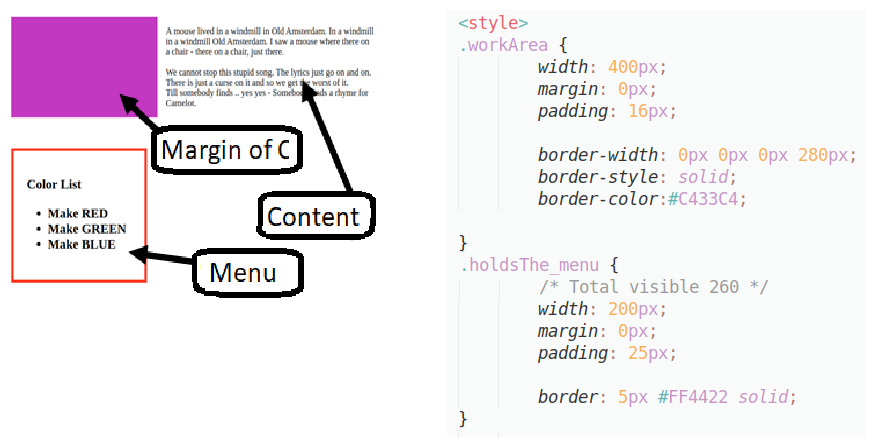
If you compare the two files quoted so far, you can see that the “CLOCK” file has the Border defined on three separate lines. The reason I called it a clock, is to help you follow the four numbers following the word “border-width” as they represent the quarter-face (12, 3, 6, and 9). This means that the fourth number is the LEFT-border width within the definition of total-width of the “.workArea” content.
Full code listings
Bringing it all together
Looking at the picture shows that the red-bordered menu is narrower than the purple space above it; so, the correct position of the menu is within that margin.
Take away
Working with the long form of the border definition helps us learn how the margin can be used. Later, the material learned can be rapidly moved into something modular and stable.