How to use an API: fetch daily images with NASA's Open API
Who doesn’t like those mesmerizing images of space!
National Aeronautics and Space Administration (NASA) provides amazing astronomical images through the Astronomy Picture of the Day service. In this tutorial, we are going to use NASA API and nasa.py library to fetch these images.
An application-programming interface (API) is a set of instructions and standards used to access a web application. APIs are a very useful tool that allow us to share information publicly. The best way to learn how to use APIs it is to program yourself.
Today, we will learn how to download and display the daily astronomical images. First, we are going to fetch today’s. image. Then, we’ll make a few changes to our code so that we automatically get an image of any date.
Here is what we’ll cover today:
- Fetch an astronomy picture of the day using NASA’s API
- Get astronomy image based on date value
- Downloading astronomy images for a range of dates
- Wrapping up
Learn how to write APIs from scratch
APIs are used for writing business logic. This course teaches you how to write API and integration tests from scratch.
Learn REST and SOAP API Test Automation in Java
Fetch an astronomy picture of the day using NASA’s API#
In the following program. we are going to download today’s Astronomy Picture of the Day(APOD) using NASA’s Open API. The program will download image files only. If there is no image file available for today’s date, it will simply print a message that says, “Image not available”.
If the image file is available, it will be downloaded on the local system. Then, our code will fetch the image from the local system and display it along with any extra information (i.e. title, url).
Next, our code will ask the user if they want to hear an audio explanation for the image. If the user chooses to hear the audio explanation, we will use the Google Text to Speech (GTTS) library to convert the text explanation to an audio file and play it.
Note: To access the services provided by NASA, we need to have a registered api key. To get an api key, we simply have to fill out a form on the NASA API website. We can also use a
demo_key.We can place 1000 requests per hour by registered api, and with
demo_key, we can only place 50 requests per day.After successful registration, you’ll get an api key in the mentioned email address. We’ll use this key later in this tutorial.
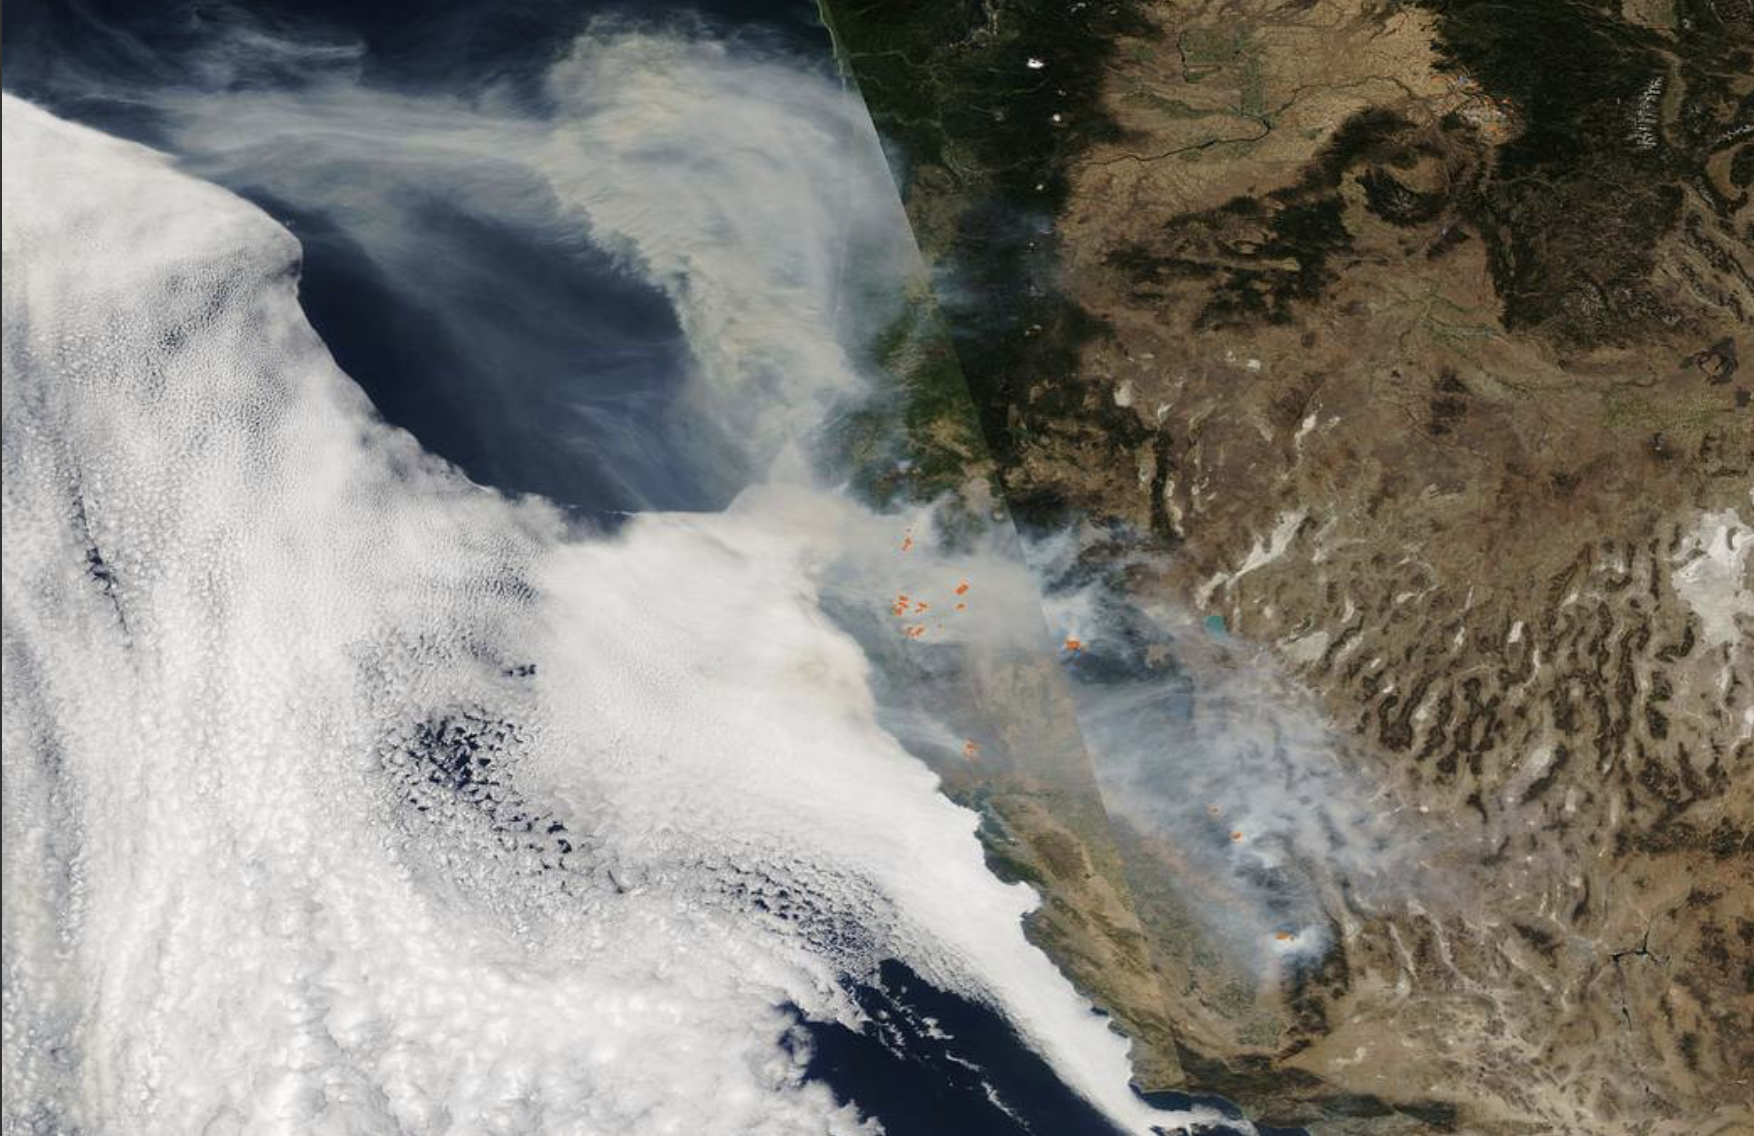
Satellite Captures Active Fires in the Western U.S.
Our Aqua satellite captured this composite visible and infrared image on Sep. 29, 2020, which shows that fires and smoke continue to dominate the landscape of the western U.S.
nasapy: We are going to use the nasapy library to access the information provided by NASA’s API.os: To store the image in a particular directory, we use the os library.datetime: We use a date while sending a request to NASA API to access the information. To get a date in a specific format, we’ll use a datetime library.urllib: The image we get from NASA API will be in a form of a URL, so we use urllib to fetch it.Ipython: We need to display the image in a jupyter notebook using Ipython library. We will also play the audio explanation of the image using the audio module.gtts: We use Google Text to Speech library to convert the text explanation of the image into an audio file.
Step 2. Create an object of Nasa class#
Here, we are going to create an object called nasa. We are using the nasapy library and our registered api key. We’ll use this object to call a method of the Nasa class to get the information on astronomical images.
Step 3. Get date in required format#
Now to get an image for a specific date, we need to pass a date in a specific format. The required format for the date is YYYY-MM-DD using the datetime.today() function. So, we need to convert this tuple into a string using the strftime(%Y-%m-%d) function.
Step 4. Get information from NASA’s API#
Now that we have today’s date in the proper format, we can place a request for today’s astronomical image. Here we use the picture_of_the_day() method to get the image data.
Our apod variable is a dictionary of various keys and values. Let’s take a look at the keys of this variable:
datetitlecopyrightexplanationurlhdurlmedia_typeservice_version
Step 5. Displaying the image and other information#
Now we will understand the code block by block.
Displaying Images:
- First of all, we are only going to display images.
- Next, we are only interested in High Definition images. So if our image has Standard Definition then we are not entering the loop.
- Now, we have to maintain a certain kind of name structure to save the images. Here, we will use the date of the image followed by the title of the image followed by the extension of the image.
- We also replace the colons and spaces with an underscore.
Creating Directory:
- Now we must have a specific directory to store the images. We create a directory using the os library. To check whether the directory exists or not, we are using
.exist()function. If the directory doesn’t exist, then we create it using.makedirs()function. - Now we fetch the image using the url retrieved in apod variable. To fetch the image we are using the
urllib.request.urlretrieve()function. - We also use
os.path.join()to store the image in the newly created directory with a specified title name. - We use
apod[“hdurl”]to download the image.
Display other information:
- Now that we have downloaded the image in a specific directory, we are going to display other related information to the image. We check if the specific information of the key exists or not. If the key exists, then we’ll display its value.
- Then we display the main image using the
Image()function of the Ipython library.
Audio Explanation:
- Now that our image and other information is displayed, we’ll ask the user if they want to hear the explanation of the image or not. If the user presses
*, we’ll use Google Text to Speech (gtts) library to convert the text into audio file. - We create an object that will take text to be converted, speed of speech and language as inputs. Then we store that information in specific directory with the
.mp3extension. - Then we use the
Audio()function to play the audio file in our jupyter notebook. - If the media type is not an image, we print a short message saying that “Image is not available”.
Please run the following Google Collaboratory file to view proper output. You can download and run this code file online on Google Collaboratory.
Get astronomy image based on date value#
But what if the user wants to get an image for a specific date? It’s very simple! Instead of using today’s date, we’ll get the date from the user in the specified format and pass that as an argument. That is the only difference in the code. Check out the complete below.
Please run the following Google Collaboratory file to view proper output. You can download and run this code file online on Google Collaboratory.
Downloading astronomy images for a range of dates#
Now that we know how to download and display an image for a particular date, it’s time we push things a little further. We will download images for a range of dates and display a random image from our downloads. Let’s understand how we can achieve this below.
Python Implementation (9 Steps)#
Step 1: Import required libraries#
These are the same libraries we used previously.
Step 2: Creating an object of Nasa class#
Here we are going to create an object called nasa. We are using the nasapy library and our registered api key. We’ll use this object to call a method of Nasa class to get the information on our astronomical images.
Step 3: Get a list of dates#
We want to download more than one image for more than one date. So, we are going to use the date_range() function of the pandas library. This function will give us the list of dates in required format. Here, the period value determines the range of the list.
We are going to download 5 images, but you can download as many as you want by adjusting the periods and end values.
Step 4: Get the data#
In the previous case, we only had one image. But here, we are going to download many images. To do so, we are creating an empty list to store all the values for all the images as a dictionary.
First of all, we’ll take the date value and store it in the apod variable. Then we are going to get the required information as a dictionary and append it in the list.
Step 5: Set the location to store the images#
Now we are going to create a directory to store images as we did previously.
Step 6: Downloading the images#
Now that we have all the information of the image and directory, we are going to download the images. We use a for loop to loop through all the data in our list.
Step 7: Get a list of images#
Now that we have downloaded all the images, it’s time to display them. There will be many images in the directory, so we can get a list of images using the following code.
Step 8: Displaying an image#
Now we can easily display an image using Image(). We are going to use os.path.join() to find the image location. Here we are going to display the image from the list of images available.
Step 9: Displaying a random image from the list#
We can use the random library of python to get a random image from the list of images available.
Putting it all together#

Please run the following Google Collaboratory file to view proper output. You can download and run this code file online on Google Collaboratory.
Wrapping up#
Congratulations of completing this fun activity with NASA’s API and Python. I hope this activity taught you some new things you can do with Python and inspired you to keep learning.
In the next part of this tutorial, we’ll see how we can send the downloaded images from email.
To download all the jupyter notebooks used in this tutorial, click here. If you have any doubts, questions, or thoughts regarding this article, feel free to contact me at shuklapratik22@gmail.com
If you want to continue learning abut APIs and want to take these skills to the next level, check out Educative’s course Learn REST and SOAP API Test Automation in Java. You will learn how to perform REST and SOAP API test automation and learn how to write APIs and integration tests from scratch.
Happy learning!
