
A high-level language like Python can be utilized to write an algorithm for any game. First, define the players and set up the game’s initial conditions. Employ if-else statements to establish the rules (e.g., if the player chooses scissors when the computer chooses paper, the player’s score increases). And finally, define the conditions for a victory, defeat, or draw. Check to make sure that the algorithm accurately determines the winner based on the chosen moves. For the game to successfully end, set up termination conditions, such as reaching a certain score.
Table of Contents
Python Tkinter tutorial: Build a Rock-Paper-Scissors game
8 mins read
Jan 15, 2024
Share
This article is part of a Python Tkinter series written by Pratik Shukla. And stay tuned for more Tkinker articles from Pratik!
This series aims to introduce you to Tkinter, Python’s standard interface to the Tk GUI toolkit, and help you build interactive games you can add to your resume. To get up to speed on Tkinter, read our first article in this series, Python Tkinter Tutorial: build a number guessing game. Once you understand the basics, come back here to build a Rock-Paper-Scissors game from scratch!
Today, we will cover:
- Rock-Paper-Scissors game walkthrough
- Rock-Paper-Scissors game implementation
- Putting it all together
- Wrapping up and resources
Rock-Paper-Scissors game walkthrough#
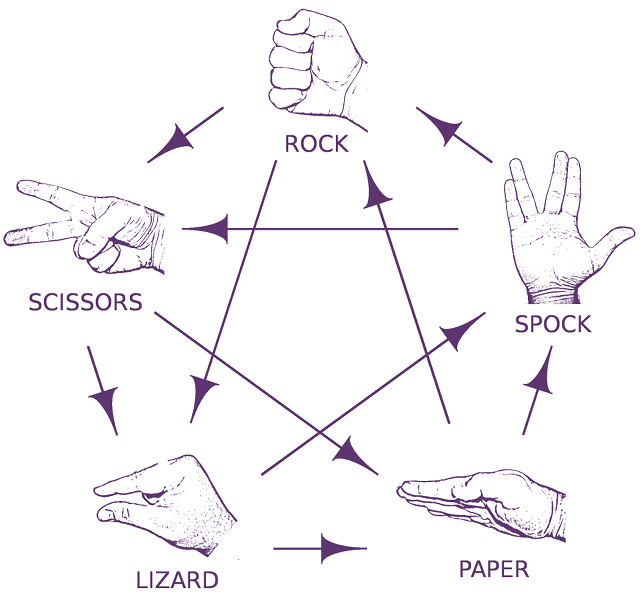
In this article, we’ll develop a modified version of the famous childhood game Rock-Paper-Scissors. If you have watched The Big Bang Theory (season 2, episode 8), Sheldon Cooper expands the Rock-Paper-Scissors game by adding two more objects: Lizard and Spock.
Let’s develop the same game using Python 3 and Tkinter. We can name our game Rock-Paper-Scissors-Lizard-Spock.
Rules and how to play#
-
Rock crushes Scissors
-
Rock crushes Lizard
-
Paper covers Rock
-
Paper disproves Spock
-
Scissors cuts Paper
-
Scissors decapitates Lizard
-
Lizard poisons Spock
-
Lizard eats Paper
-
Spock smashes Scissors
-
Spock vaporizes Rock
-
Two same objects is a draw
Walkthrough of the program#
When the user runs the program, they have to click one of the five available objects:
- Rock
- Paper
- Scissors
- Lizard
- Spock
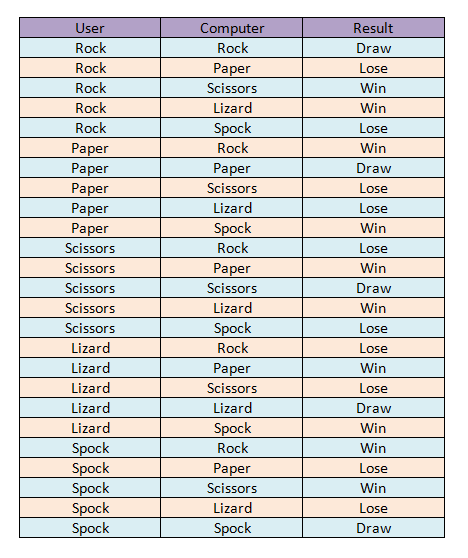
When the user selects one of the objects, our program will randomly select one object. Then, it will go through the set of rules to declare whether the user won, lost, or drew the game. The result will be displayed on the second row of our application.
When the user presses any of the buttons, the game will restart. If the user wants to close the game, then they press the “X” button on the title bar. At the start of the game, we display hand symbols for the particular objects. When the user selects an object, it will transform the display into a single graphic image. Our program also selects an object, and displays the additional graphical image for the selected object.
Complete flowchart for the game
Final result#

1 / 4
Start window (1)
Implementation in Python (10 steps)#
Now that we have a sense of what the Rock-Paper-Scissors game will entail, let’s walk step-by-step through the process in Python. If you don’t yet know how to set up Tkinter, check out our first article in this series for a brief tutorial.
1. Import required libraries#
tkinter: to add widgets in our applicationrandom: to generate a random numbersimpleaudio: to play the sound files
2. Create main Tkinter window#
root = Tk( ): This is used to initialize our Tkinter module.root.configure( ): We use this to specify the background color for our application. In our case, the background color will be black.root.geometry( ): We use this to specify at which location our application window will open. It will open at the top-left corner.root.iconbitmap( ): We use it to set the icon in the title bar for our application window. This function only accepts.icofiles.root.title( ): We use it to set the title for our application.root.resizable( ): Here, we are using it to prevent the users from resizing our main window.
3. Importing sound files#
Now, we will add some sound files to play at various events. When our program starts, it will play the Start.wav file. We’ll play the other three files when the user wins the game, loses the game, or draws the game, respectively.
One thing to notice is that it only accepts .wav files. First, we need to load the sound file in an object. Then, we can play it by using the .play( ) method.
4. Loading images in our application#
We will use various images in our application. Before we can use those images, we first need to load the images into our application by using the PhotoImage class.
First, we have hand images for our objects. All five images will be shown to the user at the start of the game. The user has to choose one object from those images.
After the user clicks an image, our program will show us the graphical image for that object. The user has to select one object, and our program will also select one object. Our program will only show those two graphical images, and the rest will disappear.
Now, we display a simple decision image that will change based on the results of the game. We have different images for our results.
- If user wins
- If user loses
- If there is a tie
5. Add Tkinter widgets#
- Initialize the variable for five buttons.
- Here, we create the result button to show us the final result.
- We set the click variable to
True, so our program keeps running until it’s set toFalse(we will see more about this in the next sections).
6. Play( ) function#
Here, we create buttons for our objects. We are going to set images for the buttons, and when it’s pressed, it will go to the youPick( ) function with the string name of the object clicked.
Then, we arrange the buttons on the main window using the .grid( ) method. Here, we’re adding a blank space in the first row with .grid_rowconfigure( ). Then, we place our result button on the second row. We’re using columnspan to center our result button.
7. Computer’s turn#
Our computer will randomly select one of the five available objects and return a string value for that choice.
8. Main function: youPick( )#
In this function, our program will display the graphical images for the selected objects. It will delete the rest of the objects. It will also apply a set of rules to generate the result.
We are storing the computer’s choice in the compPick variable. We’ll use it to decide the result.
User selects Rock:
This block of code is used if the user selects Rock. The command in the play( ) function sends along a string that represents the object selected by the user. We are storing it in the yourChoice variable. Now, there are five possibilities for the computer.
Now, we have to develop rules for each of them. Notice that when the user and computer have selected an object, they are not allowed to change it. That’s why we are changing the click variable to False.
Since the user has selected Rock, we want our first image to turn into the graphical image for Rock. Now, if the computer chooses Rock, then we want our second image to turn into the graphical image for Rock. To change the image of a button, we use .configure( ) method.
We want the rest of the three images to disappear. To make them disappear, we use the .grid_forget( ) method. Our program will also play the draw audio. Now, we develop similar rules for the rest of the objects.
User selects Paper:
See the rules from above to understand the rules for when the user selects Paper. Look at the code below, which follows the same rules as Rock.
User selects Scissors:
See the rules from above to understand the rules for when the user selects Scissors. Look at the code below, which follows the same rules as Rock and Paper.
User selects Lizard
See the rules from above to understand the rules for when the user selects Lizard. Look at the code below, which follows the same rules as the others.
User selects Spock:
See the rules from above to understand the rules for when the user selects Spock. Look at the code below, which follows the same rules as the others.
9. Play again#
After we get our results, if we want to play again, we simply have to click any of the buttons. It will transform the display to the original five hand images. In order to do this, we have to display those hidden images. We will set the value of the click variable to True. Then, we will play the start sound file so that when the user enters a new game, audio will be played.
10. Call the function#
Now we call the play function, and it’ll take care of the rest of the functions internally. To close the application, we press the “X” button on the title bar.
Putting it all together#
Take a look at the complete code for this Python Tkinter game.
Want to download the code and images? You can download all the necessary images and code from our Google Drive folder titled R_P_S_L_S.
Wrapping up and resources#
Congrats! You’ve reached the end and built a successful Python Tkinter game. Great work applying your Python knowledge. I hope you enjoyed this article and learned something new from it.
Python is such an intuitive programming language that the easiest way to master it is through hands-on practice like this. Keep up the work and keep building!
In this series on Tkinter, we’ll be developing a total of Five games using Tkinter. So, hang tight! If you have any doubts, questions, or thoughts regarding this article, feel free to contact me at shuklapratik22@gmail.com
Continue learning#
Frequently Asked Questions
How do you write an algorithm for rock, paper, scissors?
How do you write an algorithm for rock, paper, scissors?
Written By:
Pratik Shukla
Related Courses
Python Regular Expressions with Data Scraping ProjectsPython FTW: Under the HoodClean Code in PythonBuilding Robust Object-Oriented Python Applications and LibrariesSolving the Traveling Salesperson Problem in PythonUsing Python for Reading and Writing Optical LabelsIntroduction to Python for MATLAB UsersIntroduction to Data Science with PythonDesigning Graphical Causal Bayesian Networks in PythonPython Data Analysis and VisualizationPython for Mechanical and Aerospace EngineeringLearn Functional Programming in PythonFrom Python to NumpyManaging Contacts and Company Risk with Clearbit API in PythonBuild a REST API Using Python and Deploy it to Microsoft Azure
