Android tutorial: How to develop an Android app
Android development uses the open-source, Linux-based Android operating system to build apps for smartphones, tablets, and other devices powered by Google's platform. Getting started requires familiarity with key tools like Android Studio IDE, the Android SDK, Java or Kotlin, XML for layouts, and the Gradle build system.
What you'll learn
Core languages and tools: Android development relies on Java as the official language, Kotlin as a modern alternative, XML for UI layouts, and Gradle with Groovy for build automation.
Android Studio setup: The official IDE, built on IntelliJ IDEA, provides real-time profilers, a visual layout editor, a fast emulator, and an intelligent code editor to accelerate development.
Project structure and libraries: An Android project is organized around modules, Gradle config files, the AndroidManifest.xml, and popular libraries like appcompat, ConstraintLayout, Material Design, Retrofit, and Room.
Activities and lifecycles: Each screen in an Android app is an Activity with six core lifecycle callbacks (onCreate, onStart, onResume, onPause, onStop, onDestroy) that manage how the UI is created, displayed, and torn down.
Layout and view binding: Layouts are defined in XML using Views and ViewGroups, bound to an Activity via setContentView, and connected to Java objects at runtime using findViewById for interactive behavior.
Android development is all the hype these days as it continues to dominate the world of mobile development. Fun projects, great pay, and tons of job prospects are just some of the reasons developers are starting their journeys into the exciting world of the Android operating system.
Some experts say that there has never been a better time to learn Android skills, especially since the recent updates, like the addition of Kotlin and improvements to Google’s policies.
Today we will walk you through all the basics of Android development and even show you how to build your own functioning application.
Become an Android developer the easy way. Learn modern Android development with a hands-on, project-based course that walks through every stage of development.Modern Android App Development with Java#
What you'll build#
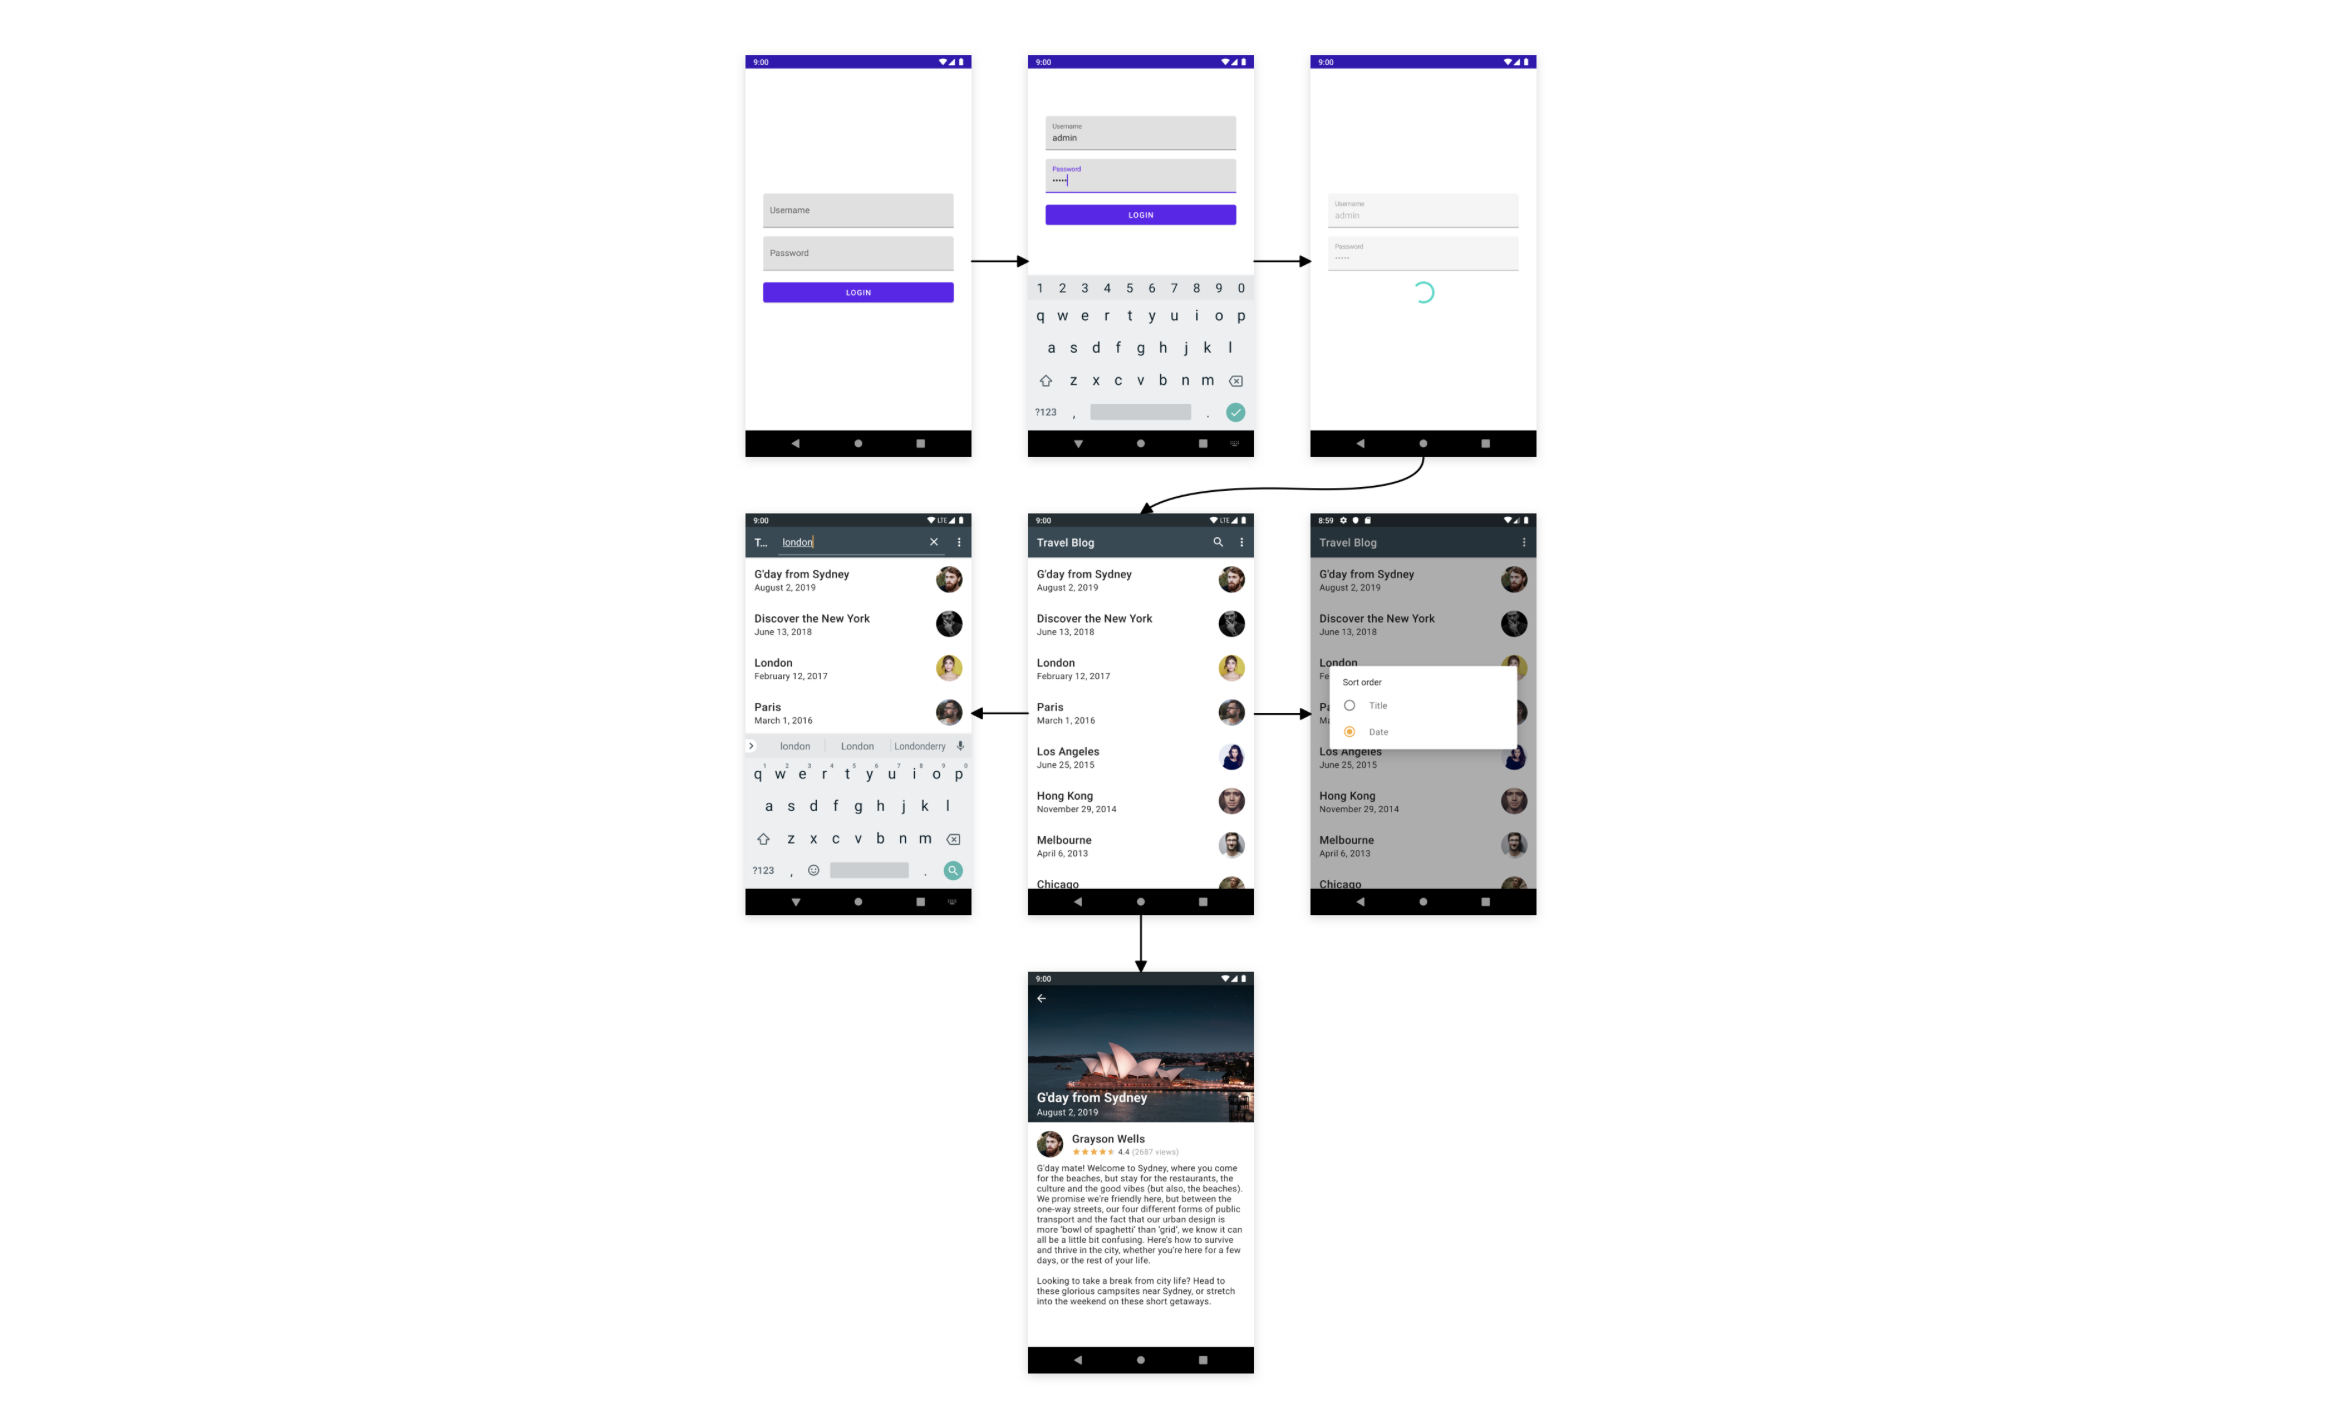
Before learning Android Studio, Activities, layouts, Views, and the Android SDK in detail, it helps to imagine what these pieces create together. Throughout this guide, we'll use the idea of a simple travel blog Android application as a practical reference point.
This is not a coding assignment or a full project tutorial. Instead, it gives you a clear picture of how Android development concepts connect inside a real mobile app. As you learn each concept, you can relate it back to a feature users would actually interact with.
Project overview#
The travel blog application allows users to explore travel content through a mobile interface.
Users can:
Browse travel articles
View article details
Read destination guides
Save favorite locations
Navigate between screens
View images and descriptions
This type of app is simple enough for beginners to understand, but realistic enough to demonstrate how Android applications are structured.
Why this project is useful#
A travel blog app uses many common Android building blocks. It includes multiple screens, visual layouts, text, images, navigation, and reusable UI components.
These same concepts appear in many other mobile apps, including news apps, fitness apps, productivity tools, and e-commerce platforms. Once you understand how they work in one app, it becomes easier to recognize them elsewhere.
Features you'll eventually understand#
Feature | Android Concept |
Home screen | Activity |
Article list | RecyclerView or list UI |
Destination page | Activity navigation |
Article layout | XML layout |
Data display | Views and ViewGroups |
Images | Android libraries |
How Android concepts fit together#
A simple Android development flow looks like this:
Android Studio↓Project Structure↓Activities↓Layouts↓Views↓Finished Application
Android Studio is where you create and manage the project. The project structure organizes your code, resources, layouts, and configuration files.
Activities represent screens in the app. Layouts define how each screen looks. Views display individual UI elements such as text, images, buttons, and lists. Together, these pieces create the final application users interact with.
Skills you'll gain#
Android Studio | Primary development environment |
Java/Kotlin | Application logic |
XML | User interface design |
Activities | Application screens |
Layouts | Screen organization |
Libraries | Faster development |
What the final application looks like#
Imagine a user opening the travel blog app. They first see a home screen with a list of destinations and article previews. Each item includes a title, short description, and image.
When the user taps an article, the app navigates to a detailed destination page. There, the user can read the full travel guide, view images, and save the location as a favorite. After reading, they can return to the home screen and explore another destination.
This simple experience introduces many core Android concepts, including screens, navigation, layouts, lists, images, and user interaction.
From beginner to Android developer#
You do not need prior Android experience to understand this guide. The goal is to build a foundation step by step so that Android development feels less overwhelming.
By learning the concepts behind this travel blog application, you'll gain the building blocks needed to create apps such as:
Travel apps
News apps
Fitness apps
Productivity apps
E-commerce apps
The specific content may change, but the structure is often similar: screens, data, layouts, navigation, and user interactions.
Throughout the rest of this guide, we'll use concepts from this travel blog application to understand how Android apps are structured, built, and deployed.
What is Android?#

Android is one of my world’s most popular operating systems for everything from 5G mobile devices to mobile apps to touchscreen smartphones and tablets. This open-source, Linux-based software is used by Google to power over 2.5 billion devices worldwide, accounting for over 80% of smartphone sales.
Android is based on the Linux kernel, which means that the basic operating structure is portable, multi-user, and able to handle complex multitasking. One of the biggest advantages of Android is the freedom of choice that comes with the technology. Not only is the hardware more diverse, but the software is very flexible and customizable.
The market for Android development is growing as more and more manufacturers, including Samsung, Lenovo, HTC, and LG, turn to Android to power their products. This means that there’s a huge demand for Android developers worldwide in diverse industries and companies!
On top of that, the new Google Play Store policies are the app development market much more lucrative. Learning Android skills will open doors and make you a desirable developer across the board.
Android development tools#
Getting started as an Android developer is easier than you might think; you’ll need to master some basic skills and tools, such as:
Programming language skills (Java, Kotlin, and Groovy)
XML
Android build system
Android Studio IDE
Programming Language Skills#

There are three programming languages and one markup language used in Android development.
Java is the official language for Android development and one of the most popular programming languages in the world. Java classes run on Android Runtime (ART), a specialized virtual machine. Take a look at this example from the Android MainActivity.java file.
Kotlin has been the second official language for Android development since 2017. Known for being much more concise and expressive, Kotlin helps alleviate some of Java’s drawbacks. Here’s an example of the above code in Kotlin so you can compare.
XML, a markup language, is commonly used in Android development to declare a layout for user interface (UI), dimensions, and strings. Take a look at this example of a layout that shows text in the middle of the user’s screen.
Android Build System#
Gradle powers the Android build automation system and expands upon the concepts of Apache Maven and Apache Ant by introducing a Groovy-based, domain-specific language. Groovy is an optionally typed, dynamic language with static-typing capabilities. It helps improve productivity and speed by integrating with your Java-based program. With Groovy’s ease and Gradle’s mature ecosystem, you can automate your software and deliver much faster builds.
Android Studio IDE#
The Android Studio IDE is your new best friend for Android development. Based on IntelliJ IDEA, it’s the official development environment for Google’s operating system. It comes with great Android-specific tooling to cover all your needs. Using this IDE will accelerate your development time, and frequent updates mean you’ll never fall behind. It comes loaded with the following features, amongst many others:
Realtime profilers and analyzer
Flexible build system
Intelligent code editor
Visual layout editor
Fast emulator
Android SDK#
The Android SDK is the official development kit for Android app development. It is composed of modular packages that can be separately downloaded from the Android SDK Manager, including SDK tool, Google API, Android support, Android Debug Bridge (ADB), and more. Just like the IDE, the Android SDK is always being updated. New releases will keep you up to date with the latest features.
How to develop an Android app#
Java for Android#
When it comes to creating Android apps, your knowledge of Java is paramount to your success. Java is the official language for developing Android applications, and it supports all of the Android tools. Knowledge of this language will make your dev experience much easier.
Java was chosen for Android development because it is well-known, well-supported by development tools, and already pervasive in the mobile phone industry. On top of that, Java runs in a VM, so it doesn’t need to be recompiled.
Install Android Studio IDE#

To get started with Android development, you need to install the Android Studio IDE. This user-friendly, drag-and-drop interface is the official IDE development environment. It is purpose-built for high-quality Android apps. This IDE will speed up your development time and make your apps far more reliable and easier to update when new features are released.
To install Android Studio on Windows, follow these steps.
Visit this link to get the latest version of Android Studio.
You can either download the IDE as a
.exefile or a.zipfile. For the.exefile, double click the file to launch it. For the.zipfile, unpack the ZIP and copy the android-studio folder to your Program files.This will prompt you to open and launch the
android-studio > binfolder.Once prompted, follow the Android Studio setup wizard, where you can select your SDK packages.
To install Android Studio on Mac, follow these steps.
Visit this link to get the latest version of Android Studio.
Once downloaded, launch the DMG file and drag it to your Applications folder.
Launch
Android Studio. From here, you can either start a new project or import previous settings.Follow the setup wizard prompts to select your SDK components.
Keep the learning going.#
Learn Android developmemnt without scrubbing through videos or documentation. Educative’s text-based course is easy to skim and features a live Android emulator - making learning quick and efficient.Modern Android App Development with Java
Creating a Hello World Application#

Step 1: Structure of an Android App#
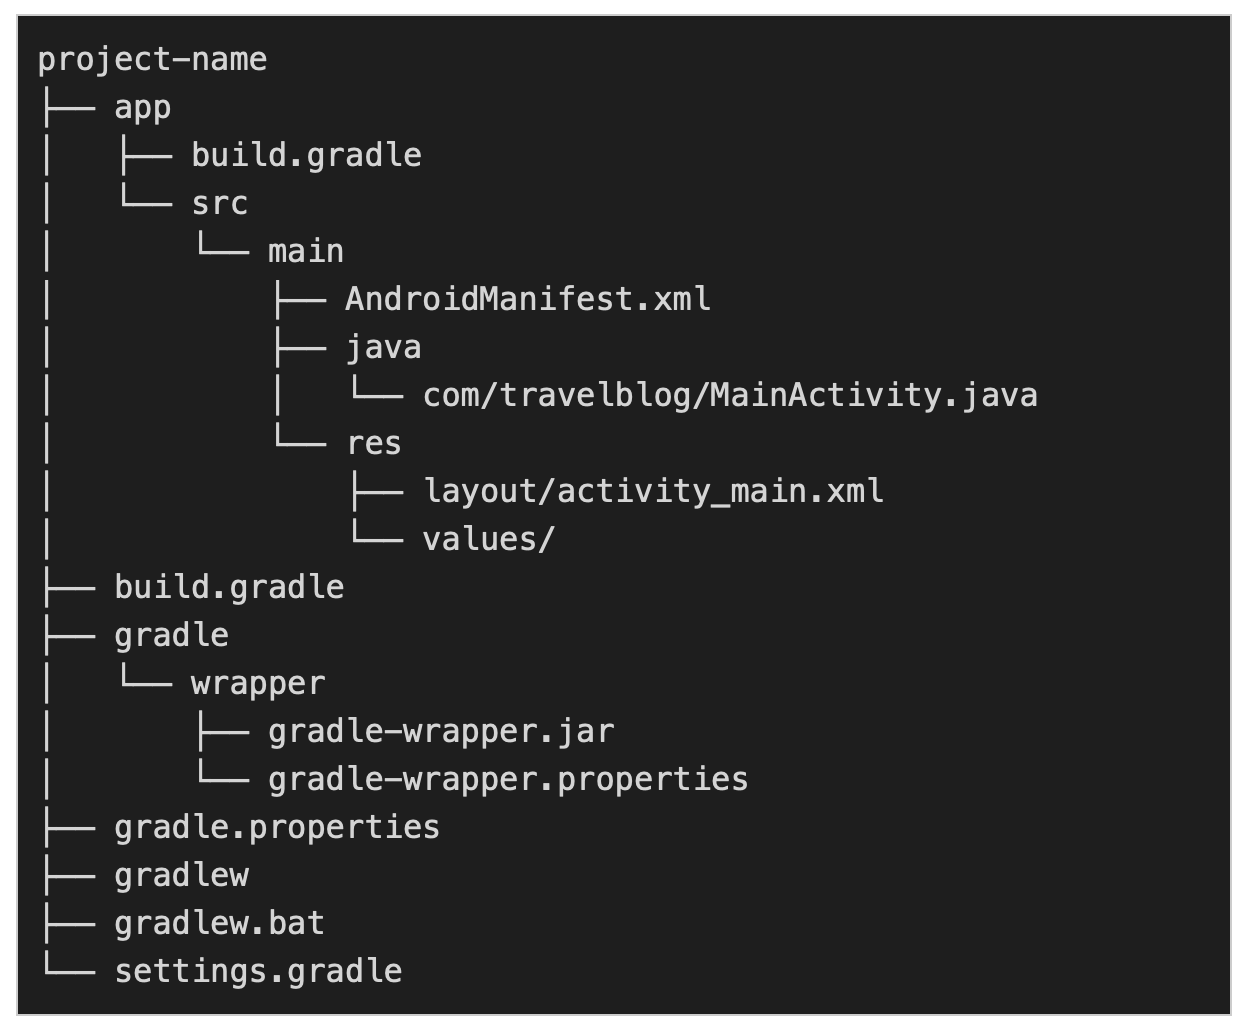
Now that we have our IDE, how do we actually make an Android project? First, let’s look at the structure of a typical Android project.
app - root module folder
build.gradle - module config file
src/main/AndroidManifest.xml - module manifest file
src/main/java - module source folder for Java or Kotlin files
src/main/res - module resource folder
build.gradle - project config file
gradle, gradle.properties, gradlew, gradlew.bat - Gradle related files for to build Android project
settings.gradle - project settings file
Project Files#
The settings.gradle file contains a list of your modules and project name. Keep in mind that an Android project can consist of one or several modules, which can each contain their own feature or logic.
The gradle.properties file defines your settings and configures a build environment.
The gradle, gradlew, and gradlew.bat files are related to Gradle wrapper, so we don’t have to manually install Gradle.
build.gradle is a top-level build file. Here we can add configuration options shared by all modules. For example, you can give your files access to repositories for core Android functionalities.
Module files#
Each module has a unique name where we put the application source code. The module build.gradle file contains the configurations related to this module only, such as:
compileSdkVersion- the version of Android SDK to compile the projectminSdkVersion- the minimal supported Android versiontargetSdkVersion- the target version of Android SDK, used to tell the system to enable compatibility behaviorsapplicationId- unique identifier of the application on the device and in Google Play StoreversionCode- an internal version numberversionName- the version name displayed to userscompileOptions- compile options to achieve some features of Java 1.8dependencies- first-party and third-party library dependencies, discussed in the next lessons
The AndroidManifest.xml is where we declare our main components. For example, a manifest file for a travel blog might contain the following things:
package- the package name of the application, in our case com.travelblogtheme- the global application theme, in our case MaterialComponents themelabel- the label which is used as a value for the application iconactivity- the activity, we currently only have one MainActivity
All resource-related files need to be placed inside predefined, sub-folders of the src/main/res folder. One subfolder, for example, is the layout folder for all your layout files. We will also have the src/main/java folder for our Java source code.
Step 2: Android Libraries#
An important part of creating your application is the unique features and tools you add to it. That’s where libraries come into play. A library is a collection of pre-written resources that can be added to your app. The Android library ecosystem is large, and you can use dozens of libraries in a single project. You can access most of the Android libraries through maven.
Adding a library to your project is easy: declare the group id, artifact id, and version in the dependencies section of your app/build.gradle file.
Here are some of the most popular libraries in use today:
appcompat - makes the apps developed with newer versions work with older versions
constraintlayout - allows creating large and complex layouts with a flat view hierarchy
material - brings material design components to Android
retrofit - a type-safe HTTP client library
moshi - a JSON parser library
glide - an image loading library
room - an official Android ORM database
dagger - a static, compile-time dependency injection framework
Appcompat
The appcompat library is great for solving compatibility issues between newer and older versions of your app. Its primary component is AppCompatActivity. This base class enables backward compatibility with older versions of Android apps. To add it to your app, use the following code:
implementation 'androidx.appcompat:appcompat:1.1.0'
Constraint layout
This library enables you to create complex layouts using a flat view hierarchy. It is common to use ConstraintLayout as the root of all the layout files.
To add it to your app, use the following code:
implementation 'androidx.constraintlayout:constraintlayout:1.1.3'

Material design
This library brings Material Design components to your app. Material design is a design language used to make your various components more user-friendly. You can take a look at the list of components here.
To add it to your app, use the following code:
implementation 'com.google.android.material:material:1.1.0-alpha10'
Step 3: Android Activity#
One of the core components of Android is activity, one screen of the application user interface. An application is comprised of multiple activities that can be launched on top of each other to form a back stack. A user can navigate through this back stack using the UI components, i.e. a back button.
For example, an app may have the following components:
LoginActivity - represents login flow
ListActivity - represents a list of recent article titles
DetailActivity - represents an article itself
Activities have their own lifecycles, so the Activity class offers six core callbacks: onCreate( ), onStart( ), onResume( ), onPause( ), onStop( ), onDestroy( ). When the user leaves an activity, the system will dismantle the activity by calling different methods. You can use these methods to check when an activity is being created or destroyed, becomes visible or hidden, etc.
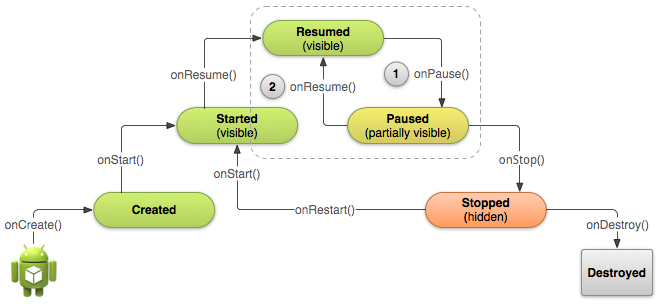
Creating an activity involves two main steps: make a Java class and extend it from the Activity superclass. You could then use the library AppCompatActivity to achieve backward compatibility. Android activities must then be declared in the AndroidManfiest.xml file.
Here’s an example for a travel blog app:
Step 4: Android Layout#
Another key aspect of Android development is developing and working with Android layout. The layout defines the overarching structure of your UI (user interface). These are built using views and view groups.
Views, also called widgets, might be components such as TextView (render text),EditText (user can type text), and Button (clickable text).
ViewGroups, sometimes called layouts, are like invisible containers that determine where certain elements will be housed. This is where you might use the Google library ContraintLayout, which uses constraints to position your widgets. The Android SDK method is simpler for beginners but offers less flexibility.
The easiest way to build a layout is by using an XML file rather than Java code. We can then bind or inflate this layout to an activity. Let’s build a layout to see how it’s done.
First, inside your app/src/main/res/layout folder, create an activity_main.xml layout file. In this example, we will use a root layout through ConstraintLayout alongside some XML attributes:
layout_width="match_parent": this defines the width of the layout.android:layout_height="match_parent": this defines the height of the layoutxmlns:androidandxmlns:app: these define XML namespace, Android namespace for attributes from Android SDK, and app namespace for attributes from libraries
Secondly, we need to fill our empty layout by defining a child view. In this case, we will define static text that reads “Hello World”. To do so, we use a TextView and the text attribute. We will use wrap_content so the view will take up as much space as possible.
Now that we’ve built our views, we move onto alignment. We want to move our text to the center of the screen since the default positions our views in the upper left corner. To do so, let’s add the following constraints:
layout_constraintTop_toTopOf: this declares a constraint to align the top of the view to the top of the ConstraintLayoutlayout_constraintBottom_toBottomOf: this declares a constraint to align the bottom of the view to the bottom of the ConstraintLayoutlayout_constraintLeft_toLeftOf: this declares a constraint to align the left of the view to the left of the ConstraintLayoutlayout_constraintRight_toRightOf: this declares a constraint to align the right of the view to the right of the ConstraintLayout
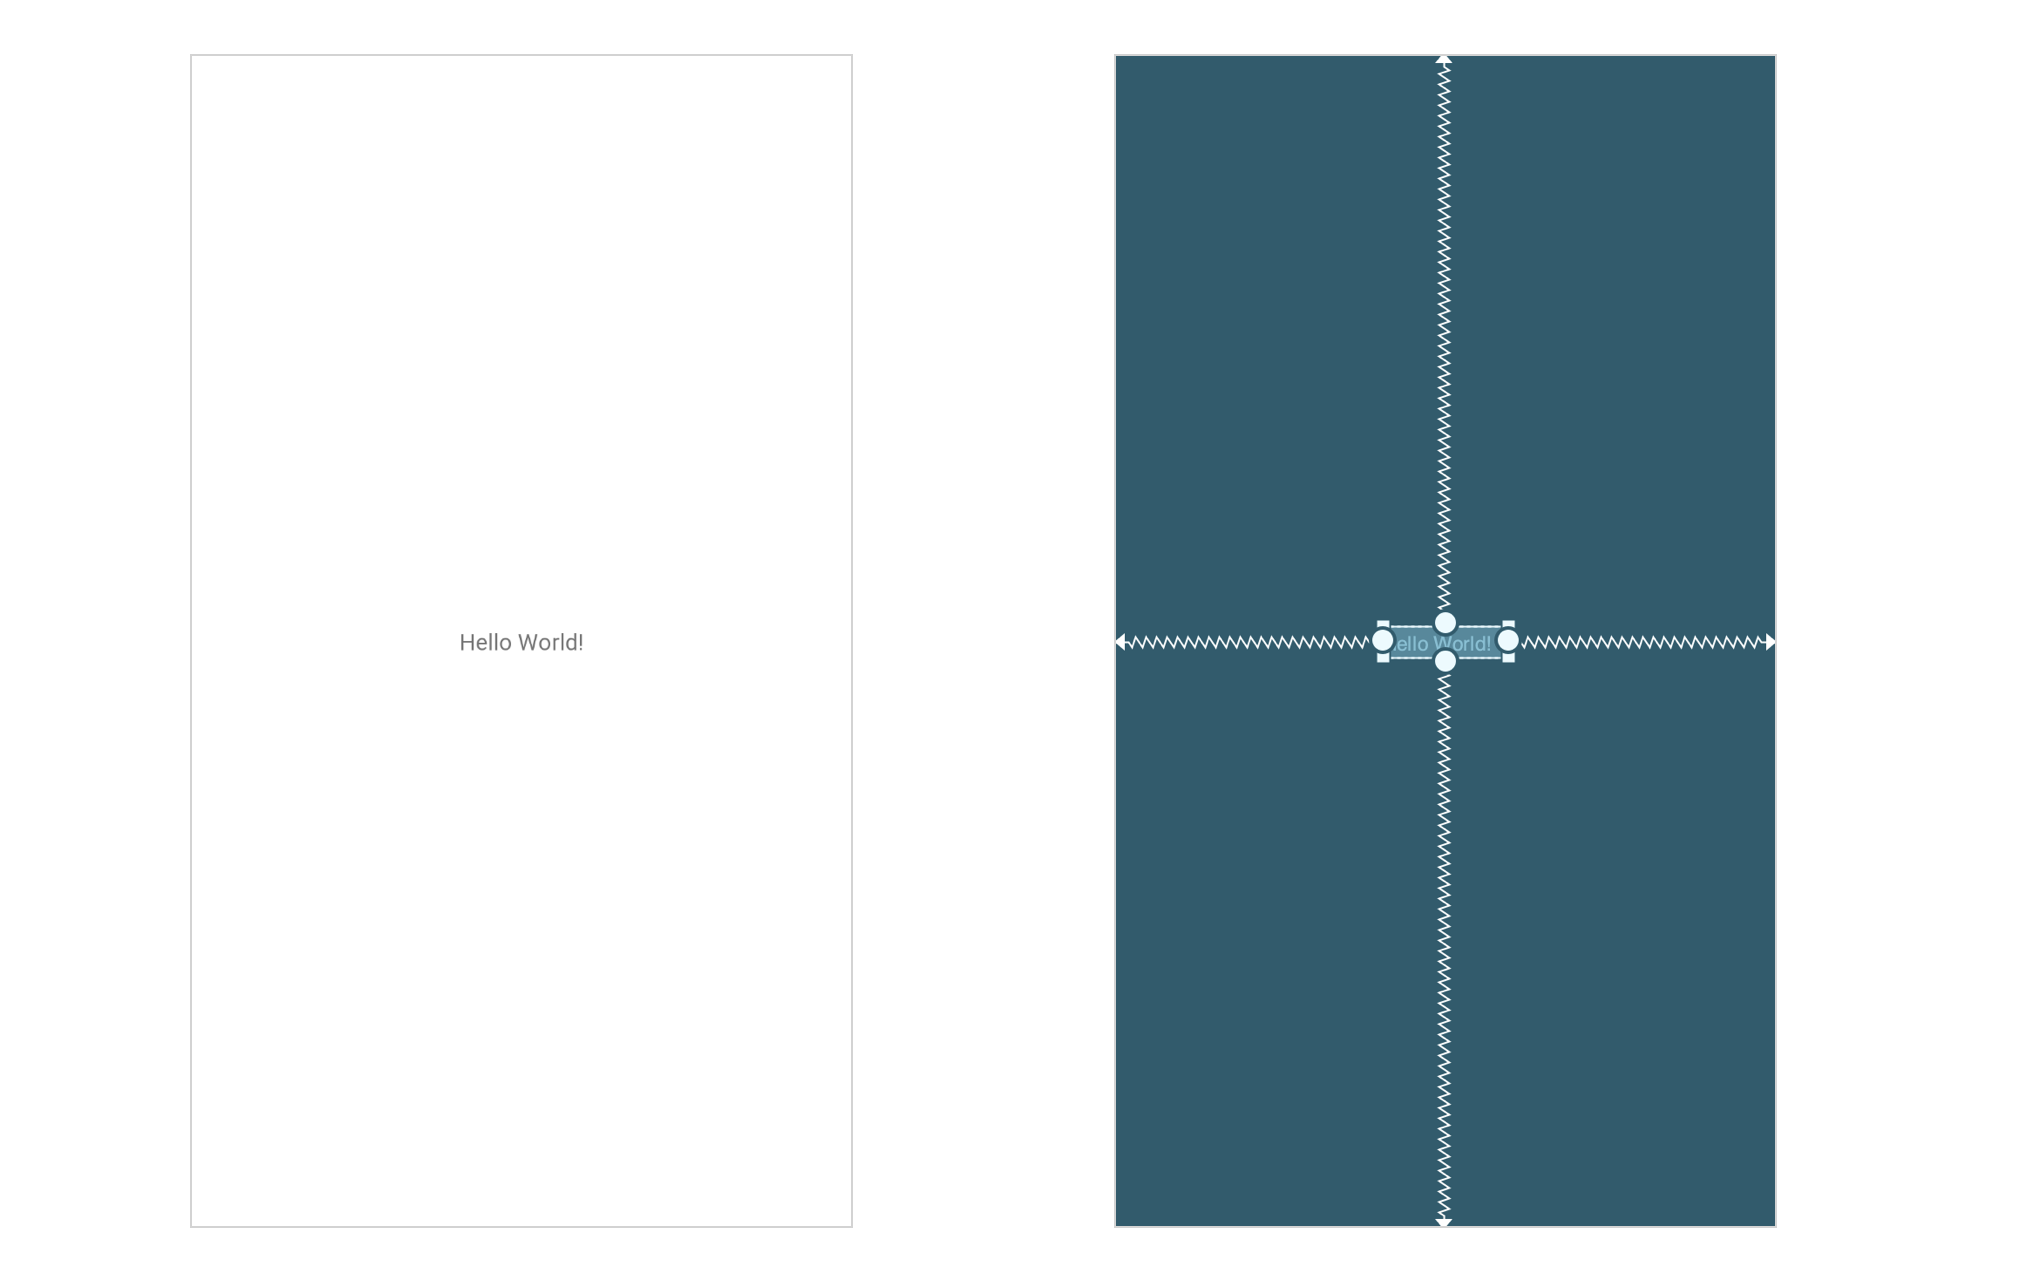
Now that everything is aligned where we want it, we move onto layout binding. This serves to associate activity_main.xmllayout with the MainActivity. We do this using the setContentView method when an activity is created inside the onCreate method.
The method setContentView accepts the layout resource ID. This is referenced by the auto-generated Android R class, where all the resource IDs are stored. For binding purposes, we can use the R.layout.activity_main to obtain the ID of activity_main.xml so we can tell MainActivity to render layout from this file.
The final step is view binding, which enables us to interact with views on runtime. To do so, we bind the view from XML to Java object.
First, we define a new ID for the TextView using the id attribute with @+id/mainTextView value.
We can now bing the TextView from XML to Java object using the findViewById method. The setText method will change our text to make it interactive.
Now you know the basic build and layout process for an Android application! It’s time for you to get started on your own! In the next section, we’ll walk you through some important resources to get you started.
Resources for Android Development#

One of the best resources out there for developers of all levels is Modern Android App Development with Java, a hands-on, project-based course that walks through every stage of development. As you learn, you’ll build a fully functional Travel Blog Application.
On top of that, the course comes with Educative’s unique pre-configured Android environment, so you don’t have to download anything to get started. It’s one of the only courses out there with this powerful widget!
Happy learning!
Continue reading about app development#
Flutter Tutorial: the beginner’s guide to cross-platform apps
A quick dive into Firebase: jumpstart your full-stack journey